10 Days Switzerland Travel Itinerary

If you have 10 days available to explore the beauty of Switzerland, here is an itinerary that will help make your trip unforgettable.

So first things first as we look at more than just visiting Switzerland but we look at some must-know to make your trip memorable.

How to get to Switzerland?

There are three ways of getting to Switzerland from any part of the world:

By air: Zurich Kloten International Airport is just about 12 kilometers away from the city center.

From the airport, you can catch a bus or take the train that will bring you to Zurich’s main station(Zurich Bahnhof).

By train: Zurich railway station(Zurich Bahnhof) is one of the busiest in Europe with excellent connections to almost all major European cities.

Depending on the train, from Paris to Zurich 4.5 hours(TGV), and Milano Centrale to Zurich 4 hours(Tren Italia).

By Bus/car: Traveling solo to Switzerland is an incredibly rewarding and unforgettable experience.

While it is easily accessible from major cities via highways, you should make sure that your vehicle has a vignette (road charge sticker) attached to the windscreen to drive in Switzerland.

Something worth mentioning about Zurich is that parking can be quite challenging.

You can find short-period parking spots (30 minutes) in the white zones but the maximum you can park is 4 hours. 

I will assume you will be using public transport buses and trains. Swiss trains and buses are very punctual, quiet, convenient, and safe plus you can easily buy a public transport ticket for the whole time you`re here.

Getting from Zurich airport to the city center

You can travel from the airport to Zurich by train, streetcar(tram line 10), shuttle bus, or taxi.

The train is the quickest way, taking about 15 minutes.  This articlehas details on all the options.

Getting from Zurich airport is easy and there are different options: A train ride that goes directly from the airport to Zurich Bahnhof. The train ticket should cost you CHF 3.40 and take 12 minutes.

If public transportation is not your thing, get a taxi from Zurich airport to the city.

Now that we have that out of the way, let`s get to why we are here:

10 Days Switzerland Travel Itinerary

Switzerland is a beautiful country filled with stunning landscapes, quaint villages, and charming cities.

With so much to see and do, planning a trip to Switzerland can be overwhelming, especially if you have limited time.

A 10-day itinerary is an excellent way to see the highlights of Switzerland while still allowing for some flexibility and relaxation.

This itinerary covers some of the most popular destinations in Switzerland, including Zurich, Lucerne, Interlaken, Zermatt, and Lugano.

It also includes two scenic train rides on the Glacier Express and Bernina Express, which are considered some of the most beautiful train journeys in the world.

With this itinerary, you’ll have the chance to experience the Swiss Alps, explore charming old towns, indulge in Swiss chocolate and cheese, and take in breathtaking views of lakes and mountains.

Day 1: Zurich

Zurich is the largest city in Switzerland, and it is a great starting point for your 10-day itinerary. The city is located at the northern end of Lake Zurich and is surrounded by the Swiss Alps.

Zurich is known for its beautiful architecture, museums, and art galleries.

One of the best ways to explore Zurich is by wandering through the old town (Altstadt). The old town is the historic city center of Zurich and is divided into two sections by the Limmat River.

The narrow, pedestrian-only streets in Nieder dorf are lined with shops, restaurants, hotels, and the residences of the locals.

With a series of bridges, it’s easy to crisscross back and forth as you explore Zurich.

While in Zurich, make sure to visit the Fraumünster Church. The church is famous for its stained-glass windows, which were designed by Marc Chagall.

The windows are some of the most beautiful in Europe and are definitely worth seeing.

Another must-see attraction in Zurich is the Kunsthaus Zurich. The museum is home to one of the largest collections of art in Switzerland, including works by Monet, Van Gogh, and Picasso. The museum is a great place to spend a few hours and is perfect for art lovers.

If you’re looking for something a little more active, take a stroll along Lake Zurich.

The lake is surrounded by beautiful parks and is a great place to relax and enjoy the scenery. You can also rent a boat and explore the lake on your own.

Overall, Zurich is a great starting point for your 10-day itinerary in Switzerland. With its beautiful architecture, museums, and art galleries, there is something for everyone in Zurich.

Day 2: Travel to Lucerne

Lucerne is a charming city located in the heart of Switzerland. It is surrounded by the majestic Swiss Alps and is home to a beautiful lake.

Lucerne is a perfect destination for travelers who want to experience the beauty of Switzerland’s nature and culture.

I assume you`ll be using public transport when in Switzerland.

Traveling by public transportation is very convenient, from Zurich, you can use the SBB regular train, the journey takes between 41 minutes to 1hr and costs 25CHF.

Luzern wooden Chapel Bridge and tower panoramic view
Luzern wooden Chapel Bridge and tower panoramic view, landmark in town in central Switzerland

Morning

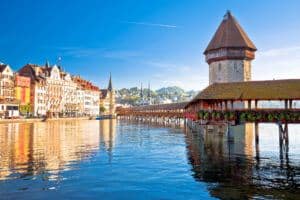
Start your day by exploring the cobbled streets of Lucerne’s old town. The best place to start is Lucerne’s iconic Chapel Bridge, which is one of the oldest wooden bridges in Europe.

The bridge is decorated with beautiful flowers and offers stunning views of the city and the lake.

After crossing the bridge, head to the Lion Monument, which is a sculpture of a dying lion carved into a rock face.

The monument is a tribute to the Swiss Guards who were killed during the French Revolution. The sculpture is a masterpiece of art and is considered one of the most famous monuments in Switzerland.

Afternoon

In the afternoon, take a trip to Mount Pilatus, which is located just outside of Lucerne. Mount Pilatus is one of the most scenic mountains in Switzerland and offers stunning views of the Alps and panoramic views of the city of Lucerne.

To get to the top of the mountain summit, take the cable car Pilatus Railway, which is the steepest cogwheel railway in the world.

The railway takes you through beautiful forests and pastures and offers breathtaking views of the mountains and the city.

Once you reach the top of the mountain, you can enjoy a delicious lunch at one of the mountain restaurants take a stroll around the summit, and enjoy unspoiled natural beauty using one of the many hiking trails.

You can also take a cable car down the mountain for a different perspective on the scenery.

Please note that the cogwheel train is closed from November to mid-May.

Evening

In the evening, head back to Lucerne and take a stroll along the lake. Beautiful parks and gardens surround the lake and offer stunning views of the Swiss Alps and the small villages.

You can also take a boat ride on the lake and enjoy the sunset over the mountains.

Lucerne is a city that offers something for everyone. Whether you want to explore the city’s history and culture or enjoy the beauty of the Swiss Alps, and snow-capped mountains, Lucerne is a perfect destination for your Swiss itinerary.

Lucerne Chapel Bridge:

The Chapel Bridge is the oldest covered wooden bridge in Europe, built initially as a fortification the bridge is 650 years old.

It has since become an iconic landmark and symbol of Lucerne due to its aesthetic beauty and historical significance.

he tower is 39 meters in width and 34.5 meters in height.

The bridge has served different purposes over its lifetime including being a prison, and a lookout post but mostly for linking the town.

Visit Lucerne Old Town

The first thing worth mentioning is that the old town is a car-free walk all you want without worrying about any traffic.

Enjoy the old town with its historical-cultural details, drink water from the historical fountains as you stroll, and relive the former wine market at Mühlenplatz.

Other places in Luzern old down:

  • Church or ST.Leodegar
  • Jesuit Church
  • Franciscan Church
  • Musegg Wall and its 9 towers
  • Needle dam
  • Lucerne Townhall
  • Weinmarkt 
  • Mühlenplatz
  • Kornmarkt 
  • Kapellplatz.

Embarking On The Golden Round Trip By Boat From Lucerne

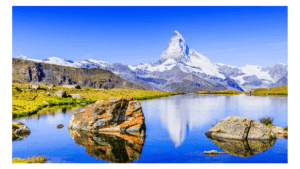
The adventure begins with a scenic boat cruise across Lake Lucerne, where you can admire the picturesque landscape and charming Swiss villages that line the shore.

Upon arrival at Alpnachstad, you board the world’s steepest cogwheel railway, which climbs an impressive gradient of up to 48%.

As the train ascends, you are treated to panoramic views of Alpine meadows, rugged cliffs, and sparkling mountain streams.

At the summit of Mount Pilatus, standing at 2,132 meters (7,000 feet) above sea level, visitors can take in breathtaking vistas of the Swiss Alps and the surrounding lakes.

There are numerous hiking trails, restaurants, and even a hotel if you wish to extend your stay on the mountain.

The descent from Mount Pilatus is equally thrilling, as you board the aerial cableway known as the “Dragon Ride.”

This cable car offers a bird’s-eye view of the dramatic Alpine landscape before arriving at the Fräkmüntegg station.

Finally, the journey concludes with a ride on the Panorama Gondolas, which glide gracefully over lush forests and rolling hills, back to the town of Lucerne.

The Golden Round Trip is an essential Swiss experience, offering awe-inspiring views and a true appreciation for the country’s natural wonders and engineering feats.
For those visiting Switzerland, especially in the summer months, this once-in-a-lifetime journey to the summit of Mount Pilatus is not to be missed.

Visit the Dying Lion Monument

Lucerne’s dying lion monument is a famous sandstone sculpture that has held a place in the hearts of locals and visitors alike, for centuries.Lion Monument in Lucerne

Located on the edge of Lake Lucerne, the dying lion is an homage to the soldiers who were ready to pay with their lives to defend.

The Lion Monument is visited by around 1.4 million people every year, but if you go back in history.

You`ll learn that the monument was created to honor Swiss guards who died protecting the life of  King Louis XVI of France and paid with their lives.

The lion still has appeal worldwide to this day. American author Mark Twain called it “the most mournful and moving piece of stone in the world.”

I don`t speak Latin and maybe I should I don`t know but “they say” Its Latin inscription roughly translates as ‘to the loyalty and bravery of the Swiss’.

Day 3: Interlaken

On the third day of the 10-day Switzerland itinerary, visitors will find themselves in the charming town of Interlaken.

This picturesque town is located between two stunning lakes, Lake Thun and Lake Brienz, and is surrounded by the breathtaking Swiss Alps.

One of the main attractions in Interlaken is the Harder Kulm, a mountain peak that offers panoramic views of the town and the surrounding area.

Visitors can take a funicular up to the top of the mountain and enjoy the stunning views from the observation deck.

Another must-see attraction in Interlaken is the St. Beatus Caves, a series of underground caves that are filled with stalactites and stalagmites.

Visitors can take a guided tour of the caves and learn about the history and geology of the area.

For those interested in history, the Oberhofen Castle is a must-visit destination.

This 13th-century castle is located on the shores of Lake Thun and offers visitors a glimpse into the past with its well-preserved architecture and furnishings.

For a more adventurous experience, visitors can take a trip to the Trummelbach Falls, a series of ten glacier-fed waterfalls that are located inside a mountain.

Visitors can take a lift up to the falls and explore the caves and tunnels that lead to the falls.

Overall, Interlaken offers visitors a perfect mix of history, culture, and natural beauty.

With so much to see and do, visitors are sure to have an unforgettable experience in this charming Swiss town.

Day 4: Day Trip to Jungfraujoch

On the fourth day of the 10-day Switzerland itinerary, visitors can take a day trip to Jungfraujoch, one of the most popular destinations in the Jungfrau region, and a UNESCO world heritage site.

Jungfraujoch is known for its stunning views of the Swiss Alps, including the famous Eiger, Mönch, and Jungfrau peaks.

To get to Jungfraujoch, visitors will need to take a train from Interlaken to Kleine Scheidegg, where they will transfer to the Jungfrau Railway.

The train ride to the top of Jungfraujoch takes approximately 45 minutes and offers breathtaking views of the surrounding mountains.

Once at the top, visitors can explore the Jungfraujoch Sphinx Observatory, which offers panoramic views of the Alps and houses a variety of scientific instruments.

The Ice Palace, located nearby, features a series of ice sculptures and tunnels carved into the glacier.

There are also several hiking trails around Jungfraujoch, including the Eiger Trail, which offers stunning views of the Eiger North Face.

Visitors can also enjoy a meal at one of the restaurants on site, which offer traditional Swiss cuisine and panoramic views of the surrounding mountains.

It’s important to note that Jungfraujoch is located at a high altitude, and visitors should take precautions to prevent altitude sickness.

It’s recommended to drink plenty of water and take breaks as needed while exploring the area.

Overall, a day trip to Jungfraujoch is a must-see for anyone visiting Switzerland, offering some of the most breathtaking views of the Swiss Alps.

Day 5: Day Trip to Lake Brienz

On the fifth day of your 10-day Switzerland itinerary, visitors can take a day trip to Lake Brienz, one of Switzerland’s most idyllic lakes.

Located in the heart of the Bernese Oberland, Lake Brienz is surrounded by stunning mountains and offers a range of activities for visitors to enjoy.

To get to Lake Brienz, visitors can take a train from Interlaken Ost to Brienz, which takes around 20 minutes.

From Brienz, you can take a boat trip across the lake to explore the surrounding area. The boat trip offers stunning views of the lake and the mountains.

You can hop off at various stops along the way to explore charming towns and villages, such as Iseltwald and Giessbach.

One of the highlights of a trip to Lake Brienz is a visit to the Giessbach Falls.

These stunning waterfalls are located on the eastern shore of the lake and are accessible by boat or on foot.

Visitors can take a funicular railway up to the falls and enjoy a stunning view of the cascading water.

For those looking for a more active day out, there are plenty of hiking trails around Lake Brienz. One popular hike is the Panorama Trail, which offers stunning views of the lake and the surrounding mountains.

You can also rent bikes and cycle around the lake, or try your hand at water sports such as kayaking and paddleboarding.

Overall, a day trip to Lake Brienz is a must-do for anyone visiting Switzerland.

With its stunning scenery, range of activities, and charming towns and villages, it’s the perfect place to relax and enjoy the natural beauty of this incredible country.

Day 6: Zermatt

On the sixth day of your 10-day Switzerland itinerary, you will explore more of Zermatt.

This charming town is surrounded by the majestic Swiss Alps, and there are plenty of activities to do to make the most out of the day.

One of the highlights of Zermatt is the Matterhorn, the iconic mountain peak that is visible from almost every corner of the town.

Visitors can take a cable car to the Matterhorn Glacier Paradise, which is the highest cable car station in Europe. From there, they can enjoy breathtaking views of the surrounding mountains and glaciers.

For those who prefer a more active day, Zermatt offers plenty of hiking trails that cater to all levels of fitness.

You can hike to the Gornergrat, which offers panoramic views of the Matterhorn and the surrounding mountains.

Alternatively, you can take a scenic train ride to the Gornergrat and enjoy the views from the comfort of the train.

Zermatt is also known for its skiing and snowboarding, and visitors can hit the slopes in the winter months.

There are plenty of ski resorts in the area, and even beginners can take lessons and learn how to ski.

In the afternoon, visitors can explore the town of Zermatt. The town has a pedestrianized center that is filled with shops, restaurants, and cafes.

Sample Swiss chocolate, buy souvenirs, or simply enjoy a cup of coffee while taking in the views of the Matterhorn.

Overall, Zermatt is a must-visit destination in Switzerland, and visitors should plan to spend at least a day exploring this beautiful town.

Day 7: Glacier Express Trip

On the seventh day of your 10-day Switzerland itinerary, you can embark on a scenic journey on the Glacier Express train.

The Glacier Express is known for being the slowest express train in the world, taking approximately 8 hours to travel from Zermatt to St. Moritz.

The leisurely pace allows passengers to fully appreciate the stunning views of the Swiss Alps and picturesque villages along the way.

The journey on the Glacier Express is a unique experience that should not be missed. The train features panoramic windows that provide uninterrupted views of the beautiful scenery.

Glacier Express journey includes a stop in the charming town of Chur, known for its well-preserved Old Town and historic buildings.

Travelers can also enjoy a delicious meal on board the train, featuring local Swiss cuisine and wines.

The Glacier Express is a great way to relax and enjoy the breathtaking scenery of Switzerland.

It is recommended to book tickets in advance, especially during peak travel season. First-class tickets offer additional amenities, such as more comfortable seating and complimentary snacks and drinks. 

Remember 1st class costs the double price so get your snacks and drinks before boarding then use 2nd class which is also as comfortable.

Overall, the Glacier Express trip is a highlight of the 10-day Switzerland itinerary and a must-do for any traveler visiting the country.

Day 8: Bernina Express Trip

On the eighth day of the Switzerland 10-day itinerary, travelers can experience the breathtaking and unforgettable  Bernina Express Train journey.

The Bernina Express is an iconic train ride that takes passengers through the Swiss and Italian Alps, showcasing stunning views of snow-capped mountains, glaciers, and alpine forests.

The train ride starts at Chur in Switzerland and ends at Tirano in Italy, covering a distance of 144 km.

This journey takes around four hours, during which passengers can enjoy the beautiful landscapes of the Swiss Alps and the Poschiavo Valley.

You`ll pass through 55 tunnels and 196 bridges, including the famous Landwasser Viaduct, which is a UNESCO World Heritage Site.

You can book your ticket here

Purchase tickets for the Bernina Express online or at the train station. It is recommended to book in advance, especially during peak season, to ensure availability.

Passengers can choose between first and second-class tickets, with first class providing more spacious seating and complimentary snacks and drinks.

During the journey, passengers can also enjoy audio guides in multiple languages, providing information about the history and culture of the region.

There are also panoramic windows on the train, allowing passengers to fully immerse themselves in the stunning scenery.

The train stops at several stations along the way, including St. Moritz, Pontresina, and Poschiavo, providing opportunities for passengers to explore these charming alpine towns.

Overall, the Bernina Express Train journey is a must-do experience for anyone visiting Switzerland.

It is a perfect way to witness the beauty of the Swiss Alps and the surrounding region and enjoy the alpine meadows providing unforgettable memories and stunning photo opportunities.

Day 9: Lake Lugano

On the ninth day of the Swiss itinerary, you should get to explore the stunning Lake Lugano.

Located in the Italian-speaking Ticino region of Switzerland, Lake Lugano is a beautiful glacial lake surrounded by mountains, making it an ideal spot for nature lovers.

One of the best ways to explore the lake is by taking a scenic round-trip cruise from town. The cruise offers breathtaking views of the surrounding mountains and the picturesque towns along the lake.

Alternatively, travelers can also use the ferry to hop from point to point along the lake or ride the ferry to Gandria and walk back to town from here.

For those who prefer to stay on land, there are plenty of hiking trails around the lake that offer stunning views of the surrounding scenery.

The Olive Trail is a popular trail that takes hikers through olive groves and vineyards, offering panoramic views of the lake and the surrounding mountains.

In addition to the natural beauty, there are also several charming towns around the lake that are worth exploring in a short stay.

Lugano, the largest town on the lake, is known for its Mediterranean-style architecture, high-end shopping, and delicious Italian cuisine.

Other towns worth visiting include Morcote, a picturesque village with narrow streets and colorful houses, and Gandria, a quaint fishing village with a rich history.

Overall, Lake Lugano is a must-visit destination for anyone traveling to Switzerland.

With its stunning natural beauty, charming towns, and endless outdoor activities, it offers something for everyone.

Key Takeaways

  • This 10-day itinerary covers some of the most popular destinations in Switzerland, including Zurich, Lucerne, Interlaken, Zermatt, and Lugano.
  • The itinerary includes two scenic train rides on the Glacier Express and Bernina Express, which are considered some of the most beautiful train journeys in the world.
  • With this itinerary, you’ll have the chance to experience the Swiss Alps, explore charming old towns, indulge in Swiss chocolate and cheese, and take in breathtaking views of lakes and mountains.

Day 10: Back To Zurich

After spending nine days exploring the beautiful cities and towns of Switzerland, it’s time to head back to Zurich.

Depending on your preferences, you can take a direct train from St. Moritz to Zurich or take a detour and visit some other places on the way.

If you decide to take a detour, one of the most popular options is to take the Bernina Express from St. Moritz to Tirano in Italy(yes Italy the country).

This scenic train journey takes you through the Swiss Alps and offers breathtaking views of glaciers, mountains, and valleys. From Tirano, you can take a train back to Zurich via Milan.

If you prefer to go straight to Zurich, there are several direct trains that run from St. Moritz to Zurich every day.

The journey takes around 3.5 hours, and the trains are comfortable and well-equipped with amenities like Wi-Fi, power outlets, and food service.

Once you arrive in Zurich, you can spend the rest of the day exploring this vibrant city. Zurich is known for its rich history, beautiful architecture, and vibrant cultural scene.

Some of the must-visit attractions in Zurich include the Old Town, Grossmünster Church, Fraumünster Church, and the Swiss National Museum.

If you have some extra time, you can also take a boat trip of Lake Zurich or visit the nearby Rhine Falls in Schaffhausen, one of the largest waterfalls in Europe.

And of course, no trip to Zurich is complete without trying some of the local specialties like Swiss chocolate, cheese fondue, and raclette.

Overall, Day 10 is a great way to wrap up your 10-day itinerary in Switzerland.

Whether you choose to take a scenic train journey, visit places like St. Gallen or head straight to Zurich International Airport, or relax in a hotel, there’s plenty to see and do in this beautiful country.

Frequently Asked Questions

How much would a 10-day Switzerland itinerary cost?

The cost of a 10-day Switzerland itinerary depends on various factors such as accommodation, transportation, food, and activities.

On average, a budget traveler can expect to spend around 2,500 to 3,500 Swiss francs per person, while mid-range travelers can expect to spend around 3,500 to 4,500 Swiss francs per person.

Luxury travelers can expect to spend upwards of 5,000 Swiss francsper person. However, these costs can vary depending on the season, location, and personal preferences for things like accommodation because luxury hotels are quite expensive.

What is the best itinerary for Switzerland?

The best itinerary for Switzerland depends on personal preferences and interests.

However, a popular itinerary is starting in Zurich and spending a few days exploring the city before heading to Lucerne and Interlaken.

From there, travelers can visit the Jungfrau region, Zermatt, and Montreux before ending the trip in Geneva. This itinerary offers a mix of city exploration and outdoor activities.

Are 10 days enough for Switzerland?

While 10 days is enough time to see some of Switzerland’s highlights, it may not be enough to see everything the country has to offer.

Travelers should prioritize their must-see destinations and activities and plan accordingly.

Additionally, travelers should consider the time it takes to travel between destinations and factor that into their itinerary.

How many days is enough in Switzerland?

The number of days needed to explore Switzerland depends on personal preferences and interests.

However, a minimum of 5-7 days is recommended to see some of the country’s highlights.

For those who want to explore more areas or engage in outdoor more activities, 10-14 days may be necessary.

Switzerland 10-day itinerary summer

A 10-day Switzerland itinerary in the summer can include visiting cities like Zurich, Lucerne, and Geneva, as well as exploring the Swiss Alps.

Travelers can hike in the Jungfrau region or the Jura region, visit the Matterhorn in Zermatt and take a scenic train ride to St. Moritz. Additionally, travelers can enjoy water activities on Lake Geneva, Lake Zurich, and Lake Lucerne.

Switzerland itinerary 14 days

A 14-day Switzerland itinerary can include exploring cities like Zurich, Lucerne, Interlaken, Montreux, and Geneva.

Additionally, travelers can take scenic train rides through the Swiss Alps, hike in the Jungfrau region and Matterhorn, and visit the picturesque villages of Appenzell and Gruyeres.

This itinerary offers a mix of city exploration and outdoor activities, providing a comprehensive Swiss experience.

Can You Bring A Tripod On A Plane?

One of the joys of traveling is capturing memories through photographs and many of us want to capture that image inside the airplane before taking off, but, can you bring a tripod on a plane?

For many travelers, carrying photography equipment, such as tripods or monopods, can pose a challenge. It’s essential to have the right photographic equipment while traveling but also.

It’s equally important to pack smartly, ensuring that all items fit within the parameters of the airline’s baggage policy.

In this post, we’ll discuss how to pack your tripod or monopod for your next solo trip.

Can You Bring A Tripod On A Plane?lady with a tripod

The answer is yes, you can bring your tripod on a plane in your cabin luggage. But there is a catch so we are going to look at things you need to do so as to make your flight pleasant with your tripod in tow.

Choose The Right Tripod Bag

When traveling solo, it’s essential to have equipment that is lightweight and portable.

There are tripods and monopods bags available that cater exclusively to travelers, which take up minimal space and are lightweight.

These compact options fit in your handbag or backpack and are perfect for solo female travelers. Check the dimensions of the equipment before buying it to make sure it will fit in your luggage.

Manfrotto MBAG100PN Padded Tripod Bag is made of nylon material.

It has an Inner pocket for tripod accessories storage and it has easy access even with the bigger video tripods.

Why Pack Your Tripods

  • Avoiding Damage:

A tripod is a crucial piece for your selfies that helps you take sharp and well-composed shots.

It’s important to ensure it’s packed properly to avoid any damage during transit.

An impact or fall while in transit can easily destroy your tripod, which will affect your overall traveling experience.

As a solo traveler, you may not have the time, budget, or resources to repair or replace damaged equipment, making it essential to pack your tripod well.

  • Complying with Airport or Airline Regulations

When traveling by air, you’re required to comply with airport and airline regulations. Some airlines may require checked tripods to be packed in a specific protective tripod case or box.

Failure to do so may result in your tripod being refused or even damaged. To avoid such circumstances, ensure you’re familiar with airport regulations and pack your tripod accordingly.

Tripod bag ffor when you fly

Can You Bring A Tripod In Carry-On Bags?

If you’re carrying more than just a tripod, such as a camera bag with other camera gear, then it will be subject to the same rules as the tripod.

If it is small enough to fit in your personal item, then it can be taken on board without additional fees.

However, if it is larger than the allowed size for the airplane overhead storage bin you might have to put it in your checked bags thus costing you extra.

Having said that it`s a good idea to always check the airline size restrictions on carry-on luggage allowance before you travel( I do it before even packing my bags).

Can You Bring A Tripod In Checked Luggage?

Although TSA regulations suggest that tripods may be taken as carry-on luggage, solo women travelers should consider the disadvantages of doing so.

Tripods can be heavy and take up a lot of room in the overhead bin, and you may have to check them anyway if the flight is full.

Bringing a tripod in checked luggage is an amazing option for solo women travelers.

Checking your tripod avoids carrying extra bags on the plane and relieves you of the potential stress of carrying it with you through security and around the airport.

Solo women travelers who are just starting their photography journey may wonder if investing in a tripod is worth it.

The answer: yes, it is absolutely worth it. A tripod opens doors to creative experimentation and provides stability to your photographs.

It helps capture the beauty of every place you visit in a unique and creative way, and it ensures that your travel memories are preserved in the best way possible.

TSA Rules on Tripods

The Transportation Security Administration (TSA) has a set of procedures to ensure passengers and their baggage are safe when traveling on planes.

As part of these security checks, the TSA carries out airport security checks for all passengers before they board their flights. These checks involve using metal detectors and x-ray machines to scan carry-on bags, as well as personal items.

As you can see from the TSA website tripods are allowed in flights.

TSA is more concerned about heavier tripods that could be used as a weapon.

Although you can take your tripod in your hand luggage, there is no guaranteed green light for every tripod, and the security officer or TSA agent has the final decision.

Again if you are taking international flights with a stopover/layover, remember rules may be different from those in the united states.

Talk to airline staff about transportation security administration in the next airport.

Tripods And Airline Carry-On Dimensions

There is nothing fixed in stone here, but most airlines accept under 22 inches.

Remember that your tripod when packed must fit in the hold bin above you or under the seat in front of you in the airplane.

Something worth remembering is that low-cost airlines like Easyjet or Ryanair enforce size restrictions more strictly and will not budge.

You may like:

How To Travel Alone Safely

Can Electric Toothbrushes Be in Carry On Luggage

Best Travel Tripods

As a rule of thumb when traveling, the best travel tripod and camera gear should be easy to pack in your hand luggage.

It should be light enough to carry and also sturdy enough to withstand your travel, especially on rough terrain.

Still, when buying a tripod, figure out which features will work for you, not to mention what works for your budget.


NEEWER Camera Tripod Monopod

This tripod is made of aluminum alloy, it`s solid and durable, the nonslip feet will help keep the tripod steady.

It’s a great choice for travel photographers or those who want to be able to take pictures without worrying about their equipment.

Manfrotto Befree Advanced Aluminum Tripod

This tripod is an excellent option if you’re looking for something lightweight and sturdy. Its aluminum construction makes it light yet solid, and its build quality ensures durability.

The center column can be rotated 360 Degrees horizontally, making it easier for panorama shooting.

Summing it up

Overall, bringing a tripod in checked luggage is the best option for solo women travelers.

Not only does it relieve you of carrying extra bags and the potential stress of navigating security with a bulky item, but it also keeps your carry-on free for the items you may need close by.

Investing in a tripod is worth it: it adds creativity to your photos and helps you capture the beauty of every place you visit.

Keep your photographs sharp and stunning while keeping yourself safe on your travels.

Traveling as a solo woman is an incredible experience. However, it’s essential to ensure that you’ve packed and protected all your essential gear, including your tripod.

Properly packing your tripod will protect it from damage, reduce weight and space in your luggage, and ensure that you’re complying with airport regulations.

Don’t allow a poorly packed tripod to ruin your trip. Follow the tips we’ve outlined in this blog post and enjoy your solo travels to the fullest!

12 Tips On How To Travel Alone Safely

It’s natural to be nervous when venturing out into the unknown, but don’t let that stop you, this post will give you tips on how to travel alone safely.

You know what I tell all the solo female travel hopefuls who are worried about their safety? Don’t let fear be the boss of you or hold you back, get out there.

When it comes to solo travel, I’m the queen of cautiousness. I`ve been traveling solo for over 20 years (by choice).

Sure, there are risks associated with traveling alone but I believe the benefits vastly outweigh the potential dangers. I’m on high alert and my intuition is always in check – it’s like I have an extra set of eyes.

Come to think of it, they are the same skills you need to stay safe when you are home.

Apart from being in a strange country where maybe most people speak a foreign language and act differently, your instincts to stay safe are the same.

Know Your Accommodation Details

When traveling solo, safety is paramount for women. Knowing the details of your hotel can help ensure a safe and comfortable stay. Here are some tips to help keep you safe when staying at a hotel:

  • Check out the hotel reviews before booking.
  • Read through customer reviews to get an idea of what other people experienced during their stay.
  • Get a Door Jam Alarm, these will make an alarm sound should anyone try to break into your room while you are asleep. With a sensitivity switch, you can set and adjust them as to what amount of movement is required for the alarm to go off.
  • Know what the hotel offers and what not.

Dress Modestly

For solo female travelers, safety should be the top concern. One way to help ensure your safety while on a solo trip is to dress modestly.

This means avoiding clothing that is too revealing or tight-fitting. Choose loose-fitted clothing made of breathable fabrics and opt for longer hemlines that cover most of your body.

Leave your skimpy clothes at home there is time and place for everything, and your tight, revealing, or short-cut tops belong at home, now in some jungle or in a custom strict country.

Don’t travel at night

For women who are traveling solo in a foreign country, safety should be a top priority. To help ensure your safety, here are some tips to keep in mind:

  1.  Avoid traveling at night if possible – especially if you’re unfamiliar with the area.
  2. It’s best to stay in well-lit areas

Don’t flaunt your valuablesbling is a no no when you travel solo

When traveling, it’s important to remember the basics of common sense. This includes leaving any flashy jewelry or expensive personal items at home.

Flaunting these items can draw attention and make you a target for theft. It is always better to err on the side of caution when traveling and leave your bling at home.

If you can`t imagine traveling without your bling, find cheaper imitations. For example, this lovely Swarovski Crystal bracelet will give you the bling without breaking the bank.

Learn Some Local Language

As a solo traveler, taking the time to learn some words of the local language is an excellent way to demonstrate your respect and appreciation for those in that culture.

Making this effort can really help you connect with locals on a new level – and maybe even make long-term friends!

There is no excuse not to today, back in the day, I learned touristy words like please, can I, thank you, where is, etc using a travel dictionary, today you can do it all online.

Talk to Locals

Locals are the best sources of information when it comes to learning about their culture. They can share local customs, traditions, and beliefs.

Talking to locals can give you an understanding of the local customs and practices and can prevent misunderstandings.

You can ask questions about local cuisine, clothing and fashion, family values, and local practices. They can also help you locate interesting and unique attractions that are off the beaten path.

traveling safely as a solo woman

If you want to learn the dialect of the place you’re traveling to, the locals are the best people to talk to.

They can teach you basic vocabulary and phrases that are necessary to know. In addition to teaching you some basic phrases, locals are an excellent source of practice.

Locals often have insider knowledge about the hidden gems of their cities.

They can point out things that tourist guides typically miss, offer unique perspectives on museums, and often provide tips on lesser-known hiking trails, waterholes, and hidden attractions.

Engaging with locals and seeking their recommendations helps you get a more authentic travel experience, they can introduce you to local reliable taxi drivers.

Safety First

This siren looks like a keychain but comes with ledlight.No one will even notice it`s a siren you hold it just as you would your regular keyholder.

While solo travel for women is relatively safe, but it is always wise to inform someone trustworthy about your whereabouts and travel plans.

Talking to locals makes you feel more welcomed and secure, they are often happy to answer any of your questions, help you navigate unfamiliar areas, and provide advice on the safe and needed places to visit.

Find other SoloTraveling Women

If you are a solo traveler, it`s ok to travel alone but when abroad, you may want to consider finding and connecting with other women who are also traveling solo.

Grouping together can provide you with a support system and a great way to make your travels more exciting but also much safer.

There are social media groups to find others who are also on their first solo trip and will be glad to join you. Just meet in a public place for that first meeting to be safe.

If something feels off, trust your instincts. Don’t be afraid to say no to someone or a situation that you don’t feel comfortable with.

If you’re ever in an emergency situation, call the local emergency number or get help as soon as possible. It may also be helpful to carry a whistle or personal alarm for added safety.

Keep your important documents safe

Anti theft bag for solo travelers

Make sure that your passport, visa, and other important documents are safe and secure.

Store them in a secure place in your accommodation or hotel room, such as a safe, and carry a copy with you during the day.

This Women’s Anti-Theft Classic Messenger Bag is small enough that you can take it everywhere with you, it has

  • Two multi-organizational compartments have a zippered pocket and slip pockets
  • Front magnetic flap hides
  • Zippered mesh water bottle pockets on each side
  • Adjustable shoulder strap
  • Point Anti-Theft security system

Be cautious about who you share personal information, such as your hotel name or exact location, with.

Official Taxis Only Please

As a solo traveling woman, safety should be your number one priority, especially when it comes to transportation in foreign countries.

One of the most important things to keep in mind is to only take official taxis.

Firstly, official taxis are licensed and regulated by the government.

This means that their drivers are required to follow certain rules and regulations, such as having a valid driver’s license, properly maintaining their vehicle, and conducting regular safety checks.

Unofficial taxis, on the other hand, could be operated by unlicensed drivers who could pose a risk to your safety.

They may also not maintain their vehicles as well, and in the event of an accident, passengers may not be covered by insurance.

  1. Official taxis have clear identification markings and logos that make them easily recognizable.
  2. This makes it easier to distinguish them from unofficial taxis, which can be misleading, especially if you’re not familiar with the local transportation system.
  3. Most official taxis have GPS tracking systems that can help in case of emergencies or if you need to report any suspicious behavior by the driver.
  4. official taxis generally have fixed fares, which means that they won’t overcharge you or try to take advantage of your unfamiliarity with the local currency.
  5. official taxis offer a sense of security and comfort, especially when traveling in unfamiliar areas at night.
  6. They can provide a safe, reliable mode of transportation, and drivers are often more professional and courteous.

It’s important to prioritize your safety and well-being while traveling as a solo woman, and taking official taxis is a crucial step in ensuring your safety.

Be Aware Of Your Surroundings

Traveling alone can be an incredible experience. You have the freedom to go wherever you want and do whatever you want without the fear of inconveniencing anyone else, but it also comes with its own set of risks.

When you’re on your own, you’re more vulnerable to crime, especially if you’re in an unfamiliar place.

However, there are several things you can do to stay safe when traveling alone.

When you’re out at night, stay mindful of any dark corners or unwell-lit areas. These areas are often hotspots for crime, so avoid them as much as possible.

Stay in well-lit areas where you can clearly see what’s going on around you. When possible, stick to the main roads and avoid shortcuts, especially in unfamiliar areas.

Also, be aware of your surroundings and trust your gut. If something doesn’t feel right, it probably isn’t.

In addition to being aware of your environment, you should also try to stay connected with people at home. Consider setting up a tracking app that can help people know where you are.

One important way to stay aware of your surroundings when out at night is to avoid distractions. This includes texting, using your phone, or listening to music with headphones on.

If you need to use your phone, make sure to step into a well-lit area and be aware of what’s going on around you.

If you’re in a new city, it’s always a good idea to research the crime rate and learn about any dangerous areas to avoid.

Talk to locals, consult your hotel staff, or join online travel groups to learn more about your destination.

Knowing about potential risks ahead of time can help you plan your travel itinerary more safely.

When traveling alone, it’s also important to be confident and assertive. Avoid appearing lost or unsure of yourself, as this can make you seem like an easy target.

Walk with purpose and avoid looking vulnerable. If you’re approached by someone and feel uncomfortable or feel it might lead to dangerous situations don’t hesitate to say no.

Trust your instincts and be ready to assert yourself if necessary.

Try Not To Be Isolated When You Walk

We’ve all been there before – leaving class or work late at night and having to trek home alone.

This can happen when you are traveling, but did you know that walking alone, especially at night, can be dangerous?

Whether it’s due to crime or accidents, the risk of harm is significantly higher when we’re isolated.

If you find yourself having to walk alone, be sure to stay alert and aware of your surroundings. Trust your gut – if something feels off, don’t hesitate to call for help or seek refuge in a public place.

A twisted ankle or fall can lead to serious injury, leaving you stranded and vulnerable. If possible, stick to well-lit paths and avoid shortcuts through dark alleys or secluded areas.

Feeling vulnerable, anxious, or unsafe can lead to feelings of isolation and anxiety. Instead, prioritize your safety by seeking out alternative forms of transportation, such as public transit or ridesharing services be safe as a solo traveling woman

More Tips On How To Travel Alone Safely

  1. Be careful about departure times, on a trip to Egypt my departure date was the 20th at 3 am, I did not realize that it meant the 19th early morning, not the 20th night.
  2. Know the exact location of the airport especially when flying out to a different Airport, I once went to the wrong airport in Cologne Germany.I can`t even explain how it happened.

Traveling Alone And Safely Is Possible

All-in-all, traveling alone as a woman can be a wonderfully freeing experience.

With the right planning and precautions in place, you can feel secure against any potential risks and allow yourself to explore this new land with confidence.

Remember that if you do encounter any difficult situations, staying calm and composed is always key.

Take some time to get familiar with the culture and customs of the country you’re visiting before your trip.

This is not only important to remain respectful while abroad but also to ensure your safety wherever you go!

Last, stay connected with friends and family by using online resources or texting. You never know when an emergency might arise, so having another person in the loop can help make all the difference!

So, with all this said, what are your best tips for staying safe when in a foreign country? Share your advice with us in the comments below so we can support each other on our journeys!

Can Electric Toothbrushes Be in Carry On Luggage

Air travel can be stressful enough without having to worry about what you can and cannot bring in your carry-on luggage. One item that may cause some confusion is your electric toothbrush.

Can Electric Toothbrushes go in hand Luggage or do you need to leave it behind? Today we`ll answer the questions and look at some limitations you have to understand.

Can Electric Toothbrushes Be In Carry On Luggage?

Yes, you can bring either an electric toothbrush on a plane in your hand luggage just as you can bring in a manual toothbrush.

To be fair I think it`s advisable to bring your toothbrush with you in your carry-on baggage, especially on those long-haul flights.

But Just because it`s allowed does not guarantee it will be accepted everywhere so always make sure to follow any airline regulations regarding electric toothbrushes.

Some airlines may have specific rules about the size or battery capacity of electric toothbrushes.

Make sure to check with the airline beforehand to avoid any issues as airlines do have different policies regarding battery-powered devices.

Do you have to show an electric toothbrush at airport security?

No, you don’t have to take your electric toothbrush out of your hand luggage to go through airport security, although you might be asked by a TSA agent to prove that you can turn it on before you can transport it in your carry-on baggage.

Carry-on luggage size and weight restrictions

Now for those who`ve not flown recently, carry on have sizes and weight restrictions, pack well and safely, and do not pass the allowed weight.

Most airlines have a maximum allowance of 10 kilograms and will charge you extra if your carry-on is heavier than that. Budget airlines are also very strict on carry-on luggage size.

Different Airlines, Different Airline Regulations

Not all airline regulations are written equally, every airline has its dos and don’ts when it comes to portable electronic devices in carry-on luggage.

Your airline should be able to advise you prior to travel. No more than two individually protected batteries may be carried per person and batteries must not have a voltage greater than 12 volts.

Use Electric Toothbrush Travel case

A  travel case for your electric toothbrush will protect it from damage during transit and prevent any bristles from being flattened or bent out of shape. It will also prevent any chance of damage to the lithium-ion batteries.

Remove the brush head

Removing your electric toothbrush brush head before packing is a good idea. This will save space in your luggage and prevent any accidental activation of the brush while in transit (nobody wants a vibrating suitcase!!)

You may like

Laptops in checked luggage

can I bring scissors in my carry-on luggage?

Take an Electric Toothbrush in a Travel case

When traveling with your toothbrush in hand luggage, it`s advisable to put the electric toothbrush in a travel case like this one.

This will help keep your toothbrush safe and still working when you reach your destination.

The Best Electric Toothbrush for Travel

This is not to say you have to go out and buy a new electric toothbrush, but dentists recommend Philips Sonicare DiamondClean Smart 9700 as the best electric toothbrush for travel.

Let`s see why it comes above the rest.

  • It comes equipped with smart technology that provides real-time feedback on your brushing habits.
  • The DiamondClean Smart 9700 has five different brushing modes, including Clean, White+, TongueCare+, Gum Health, and Deep Clean.
  • It is small and lightweight, making it easy to pack in your luggage or carry-on bag. The brush also comes with a travel case that allows you to store the toothbrush and up to two brush heads, making it even easier to travel with.
  • The case also doubles as a charging station, so you can keep your brush charged and ready to go at all times and not compromise on oral hygiene during your travels.
  • The DiamondClean Smart 9700 has a long battery life, allowing you to use the brush for up to two weeks on a single charge.
  •  Comes with high-quality brush heads. The brush heads are easy to replace and come in several different styles, including standard, sensitive, and gum care.
  • The brush also has five different brushing modes, allowing you to customize your brushing experience to meet your specific needs including your gum health.
  • It is lightweight and easy to transport, and the long battery life means you can use it for up to two weeks on a single charge.

Go Easy on The Toothpaste When Fling

According to TSA regulations you can bring in an electric toothbrush in your carry-on luggage. There are however restrictions on the quantity of liquid, gels, and aerosols (LGAs).

Check for any potential restrictions on carry-ons before you start traveling, and check with the airline and TSA to be sure because even simple everyday items may land you in trouble for example bug repellants are not allowed in some counties.

Here is a PDF on a list of items not allowed in specific countries.

Your toothpaste tube should be 100ml or less and should fit in the 1 bag of liquids allowed in your carry-on.

Can You Take an Electric Toothbrush in Checked Luggage?

Battery-powered devices are generally discouraged from carry-on luggage.

There are always restrictions when traveling on airplanes with batteries, Lithium batteries can produce high heat levels, and cause ignitions resulting in dangerous fores.

Because of the sometimes high temperatures in the airplane hold, it can cause batteries to expand or explode.

Fly safely with your Batteries

You should comply with aviation authority guidelines -if laptops and phones are being shipped make sure they are separately packed.

Carry Fewer PEDs :

These are the equipment used with lithium batteries as the source of power.

Think electronic devices cameras, laptops, power banks, e.readers, and even some medical devices. When flying, try to have as less as possible of batteries consuming gadgets.

Protection From Damages

When flying with your gadgets, make sure that you have packed them the right way and with adequate protection to avoid any kind of damage.

You may also choose to carry power banks and other sources of energy, but make sure they are safe for air travel.

Put the batteries in a good place so as not to damage them and prevent unintentional fire incidences.

Switch Off Devices

If you are on board with gadgets using batteries, switch off the gadgets entirely.

I hope this post will help you make an informed decision on your next travel. If you have any questions about cabin baggage, just leave me a comment below, and I will get back to you.

Air Carrier Regulations:

Before flying, always check the regulations your airline has in place regarding carrying batteries on board and follow those because each airline does make its own regulations as to what you can check in your hand luggage on board.

Last Word On Flying With Electric Toothbrush

If you’re traveling internationally with an electric toothbrush, check the compatibility of the voltage converter in the docking station with the country you’ll be visiting

.

If you are unsure, I`d suggest taking along a Voltage Converter, Universal Travel Adapter, this is my must-have when I travel, it`s a combo that works in Europe, the USA, and over 180 other counties worldwide, you can`t go wrong with that.

Can I Bring Scissors In My Carry On Luggage?

pack scissors in your carry on luggage

One of the frequently asked questions from travelers is: “Can I bring scissors in my carry-on luggage?”

This is mostly asked by travelers who prefer to travel light with only backpacks or carryons(sometimes referred to as cabin bags). Well, it’s an often misunderstood rule for sure!

Traveling can be a stressful experience, and packing your luggage for the journey is a critical part of making sure that you have everything you need during your time away.

One item found in many people’s bags is scissors(especially nail scissors)but did you know that there are specific regulations about whether or not scissors can make it through airports in your carry-on?

This blog post will discuss what kind of scissors can fly with you, as well as other rules from airlines regarding items like nail clippers and craft knives.

Join us to find out if scissoring the skies is something travelers should prepare for on their next flight!

Are Scissors Allowed in Carry On Luggage?

The answer is yes and no. According to the TSA site, they MUST be less than 4 inches from the pivot point. They should be securely wrapped to prevent injury to baggage handlers and inspectors.

But please understand that although an item may be generally permitted, it may be subject to additional screening or not allowed for different reasons.

But having said that, from experience, most airport security will JUST NOT ALLOW your sharp objects. I think this is at the discretion of the agent screening your luggage.

So when packing, check well thetype of scissors you put into your carry-on baggage and avoid any long blades as the blade length is what makes or breaks the allow or not allow at the security checks.

Are straight razors allowed in a carry-on bag?

No, straight razors are not allowed in your carry-on luggage if/when they have a sharp blade attached.

Instead of straight razors, cartridges razors, and electric razors are allowed in your carry on so take what works best for you.

You may like

Can I bring a nail clipper on a plane?

The straight answer is yes, you can bring nail clippers, nail cutters, and cuticle cutters are allowed in your luggage.

As a responsible traveler, pack your nail clipper safely just as you`d pack any sharp objects to avoid any injury.

Security checks can be intrusive so try to make yours as painless as possible by choosing the right size carry-on item.

Because Remember if an item is not allowed in your carry-on, you might be forced to check in your whole hand luggage for a small commission.

Check this

Long-Handled Toenail Clippers for Seniors

Why are scissors not allowed on planes?

While scissors are certainly not the only sharp object banned from boarding in airline travel, they do stand out among other commonly prohibited items like pocket knives and box cutters.

But as we`ve seen, things like brow tweezers in your luggage, if packed well, is not prohibited item, especially on domestic flights.

As travelers, we are often left scratching our heads trying to understand why certain items on the restricted list can be dangerous when traveling by air.

Of all the items there is a surprisingly strong consensus surrounding the restriction of scissors on planes.

You may like

Can you bring scissors on a plane in checked luggage?

Yes, scissors of any size can be carried in checked luggage. Just warp and pack them safely not to injure baggage handlers or yourself when you open your suitcase.Traveling with scissors in an aeroplane in a carry on luggage

Why are scissors not permitted on planes?

While scissors are certainly not the only sharp object banned from boarding in airline travel, they do stand out among other commonly prohibited items like pocket knives and box cutters.

The final decision rests on the TSA agents screening your baggage. Not only that but you should remember that specific rules might be different depending on the airport.

We all want to make sure we keep ourselves safe while traveling, so it’s important to understand what is allowed on planes and what isn’t, If you are not sure, put it in your checked bag.

Carry On Travel Size Restrictions and Rules

Don’t get caught off guard when it comes to your carry-on luggage! Different airlines and locations can have varying rules and restrictions.

The EU, for instance, has specific regulations that prohibit large quantities of liquids, personal products, and items like blades and large scissors.

Additionally, airlines often check the size and weight of your bag to ensure it can fit in the overhead bins and aren’t too heavy.

A typical weight limit is around 10kg to 12 kg(thanks BA for accepting any weight provided a passenger can lift it on their own to place in the overhead bins).

Read more on EU-accepted carry-on sizes and cabin bags.

What Is a Checked Bag?

We mentioned the word checked bag several times above but i realize some may mistake it for a polka dot. (it`s not)

A checked bag is any kind of luggage(mostly a suitcase) that you hand over at the check-in desk and retrieve at your final destination airport.

For Example, if you are flying from Zurich to Nairobi( I mentioned Zurich because I love Switzerland) using Qatar Airways, with a stopover in Doha, you`ll give your bag/suitcase at the Zurich check-in desk and retrieve it in Nairobi.

Should You Check Your Luggage or Carry On?

It`s really hard to say, both types of luggage have their pros and their cons. You should weigh up the pros and cons to find the best option for you.

Using only carry-on can help you exit the airport much faster at your final destination.

Checked baggage has fewer restrictions and you have more space to pack more items, including some banned items in hand luggage like a Swiss army knife(yes it`s not allowed in carry-on)or walking sticks.

Note:

Before deciding on a carry-on only, think of the time you`ll spend at the airport if you have a  stop over, dragging your luggage along. I spent 12 hours in Dubai Airport with my 10 Kg cabin bag, laptop bag, and a handbag, NOT FUN AT ALL.

Final Word On Scissors in Carry-on Luggage

While most people know to remove laptop batteries and check liquids, not carry over 200 cigarettes, many forget something rather surprising – scissors!

That’s right: even if they’re blunt enough to cut paper without the risk of hurting yourself or another person, scissors are not guaranteed safe passage through security checks.

Even if you can keep scissors in your hand luggage, remember that the next airport might have strict rules regarding what`s acceptable and what’s not.

Airport rules are not the same everywhere, some airports have specific rules as to why they`ll not let an item that just came in from another flight be in your carry-on.

So apart from checking the size of scissors, be prepared for disappointment. Regulations might be similar in domestic flights but totally differ on international flights and international airports.

Do you still have questions about what you can bring in hand luggage?

Here is a full list from the TSA website on items allowed in hand luggage and what items are not(items that should go into your checked luggage).

Check it out, you might be surprised at what items you can actually take with you in your travel bags that you never even thought of.

Check Tsa’s website tsa.gov on their stand regarding sharps.

Will Chocolate Melt in Checked Luggage?

So you`ve informed yourself that sweets are subject to airline policies and restrictions, especially for International flights and you know you can take chocolates but, Will Chocolate melt in checked luggage? Not if stored properly.

Chocolate in checked luggage may seem like an unsafe place for it, but thanks to the temperature in the aircraft’s belly being lower than 65′ F, your chocolate should not melt. 

I just pack my chocolate separately in these bags, that way I’m sure even if for a reason some melt, not everything will be ruined

Your chocolate requires room temperature, the cargo hold – temperatures are kept at a cool 65’F or lower, so it’s just like having an extra-large refrigerator!

Types of chocolate

There are a few different types of chocolate in the market, milk chocolate, dark chocolate, white chocolate, and liquor chocolate. There is something for everyone with a sweet tooth.

Solid chocolate

  1. Boxes of chocolates
  2. Chocolate candy bars
  3. Milk chocolate
  4. Chocolate Cookies
  5. Chocolate chips

Artisan Chocolate

Lose yourself in a world of these individualy handcrafted chocolates, each lovingly crafted to perfection.

Each piece is individually made with attention and care that’s reflected through its unique shapes and forms – these truly are chocolate masterpieces!

You won’t find them anywhere else than with hand-made confections and with the price to match, but a price tag is not always a deal breaker for a real chocolate lover.

Dark Chocolates

Dark chocolates are a real treat – made from cocoa, sugar, and other ingredients carefully combined to bring out their rich flavor.

That’s why so many people pleasure in them; for the smooth texture and intense taste that no one can resist, it`s a sweet treat for everyone.

Savour the rich, indulgent taste of dark chocolate! Treat yourself to an irresistible treat that’s sure to tantalize your taste buds. Let its velvety texture and complex flavor leave you in a state of blissful delight.

Liquid Chocolates

pack chocolate in your checked in luggage

Liquid chocolates are a delightful treat bursting with sweetness and flavor. An array of delicious recipes can be made using liquid chocolate, from cakes to cookies to fondues – the possibilities for indulgence are endless!

These will be

  • Nutella
  • chocolate sauce
  • chocolate syrup

You might be tempted to check in your liquid chocolates in your hand luggage so as to have more control, be aware that you can only take 95 grams.

With their silky texture and indulgent flavor, liquid chocolates are a treat for all the senses.
Alcoholic Chocolates/Chocolate Liqueur
For those looking for a luxurious indulgence, look no further than chocolate liqueur and adult alcoholic chocolates!
Chocolate liqueurs are made by combining vodka or whisky with cocoa flavors to create an exquisite flavor sensation.chocolate liqueur
Adult alcoholic chocolates offer something unique – they mostly feature solid stems of dark chocolate surrounding hollow bodies filled with liquor.
Both options tantalize anyone’s taste buds any chocolate lover while adding a touch of sophistication that can only be found in these special treats!
Now you should be careful when bringing alcoholic chocolates to countries that ban alcohol consumption, you might pass airport security but trouble could be waiting ahead.
Edibles
Now this is a very sensitive area for me to talk about and im not 100% sure I want to still:
Transporting chocolate delicacies sans consequence to potentially facing severe criminal repercussions.
The legal landscape for edible chocolates is ever-shifting – make sure you’re aware of how the laws apply to your situation before indulging in sweet treats.
I`d suggest you read the actual TSA standing on edibles.

The Chocolate Melting Problem

The biggest problem you`ll have when traveling with chocolate is that it could melt, melted chocolate does not look as lovely and we eat everything with our eyes, it`ll not be as tasty.

As any chocoholic knows, not all chocolate is created equal – some melt faster than others. Not surprisingly, dark chocolate with its higher cocoa content dissolves more quickly compared to milk or white varieties.

if your favorite bar doesn’t last as long when near a heat source, we`ll look at ways to fly with your chocolate(but please understand I`m not a chocolatier but speaking from years of experience taking chocolates internationally for self-consumption).stop chocolate from melting when you fly

Bringing chocolate on a plane in the summer can be tricky! The complexity of its composition means that changes in temperature – such as being stored inside checked baggage during hot weather – could cause it to melt.

Depending on where you’re traveling and when checked baggage may expose your chocolate bars goodness could quickly turn into a sweet ooze.

Travelers should take all necessary precautions when bringing their chocolates with them!

How To Carry Chocolates In Flight Without Them Melting

Beat any unexpected heat in the checked luggage hold by freezing your chocolates before you hit the road!

To ensure they stay intact, pack them in an insulated container and some icepack but preferably in a freezer bag.

Guaranteed to keep them looking and tasting as sweet as when you left home!

This post is about chocolate in checked luggage, but you`ll be glad to know you can also take your chocolates, candies, and other foodstuffs in your carry-on luggage.

According to https://www.tsa.gov

You are allowed to take well-packed food in your carry-on or checked luggage. To make things clear before you start packing.

Understand that liquid foods and gels will undergo x-ray screening, with no exceptions.TSA officers make the final decision on whether certain items are permitted into the secured areas of the airport.

So be prepared you might have to part with some of your products. There are days you might meet some bad-tempered officer who`ll make your life hard, so for me personally, I just do pack my chocolates in my checked-in baggage.

Cacao/cocoa powder

If you’re planning to bring something like cocoa powder through airport security there should be no issue.But having said that, it does not mean you can bring in 20 Kg of cocoa powder, this may double the screening and you may have to answer some tough questions.I brought about 7 kg of cocoa powder from Ghana once and got a warning because the TCA agents felt that was too much cacao for one person`s consumption.

Should you declare or not declare?

Once you are off to baggage claim and passed immigration, you may see a line for people with items to declare and a separate line for people with no items to declare.

These lines are usually green and red in most airports, green for nothing to declare and red for something to declare.

You might join the red line for people with something to declare but the customs agent may choose to let you through without searching your luggage even if you have solid food items.

On the opposite side of the coin, you might join the green line indicating you have nothing to declare but the customs agents may still stop you and search your luggage.

If you have nothing to declare chances are you can get through without any delay but you could always be subject to random secondary screening.

What if My Luggage is Delayed or Lost?

Although lost luggage is an uncommon issue, it’s always good to be prepared.

If your bags arrive late or miss the flight altogether and are stored in “lost luggage,” then keeping chocolates at room temperature should keep them safe from spoilage.

So even if there happens to be a delay on the way with some of your chocolate in tow – fear not– as long as they stay out of direct sunlight during their journey, they will be fine.

But now this is not the case with chocolate syrup or liquid chocolate, when an airline lost my luggage for 2 weeks, there was nothing there to salvage.

Final word On flying with Chocolate

You can enjoy a variety of sweet treats without having any difficulty getting through the united states TSA security!

Take them in your hand luggage or checked pieces as solid chocolate or whatever works best for you.

However, make sure liquid chocolates are in accordance with the liquids rule and be prepared for additional checks if packing fudge or cocoa powder.

For international flights, inform yourself because airport security differs in each country.

Bon, voyage -tastefully!